
Hi everyone,
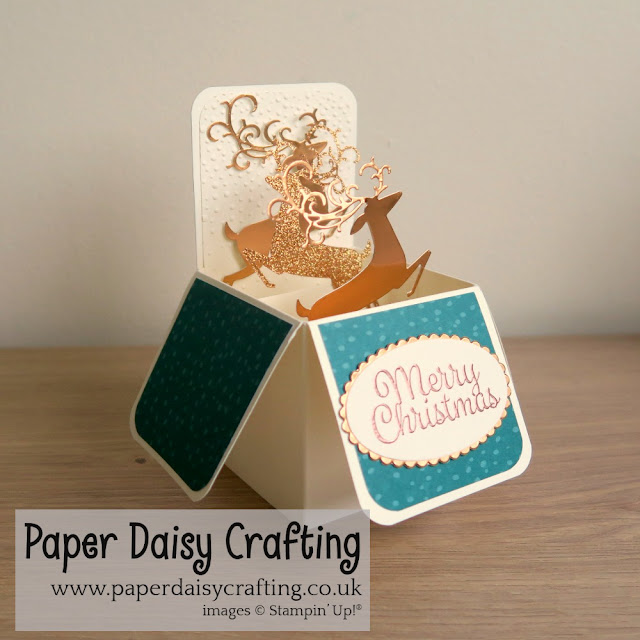
At the team training event I attended a few weeks ago, one of the Make and Take projects, designed by my upline Michelle Last, was a pop up card in a box. I've not made one of these before and was keen to try it but decided to change it up a little. Michelle used the "Spirited Snowmen" stamp set for her card and went for a more shabby chic, vintage look. I went (as usual) for a more clean and simple look. This was the card I made:
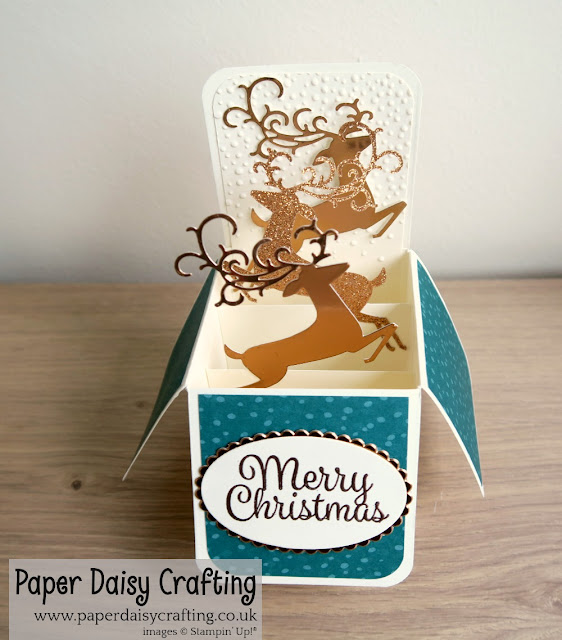
I used the leaping deer die from the Detailed Deer thinlits, cut three times from copper foil card and copper glimmer paper (from the Joyous Noel pack).
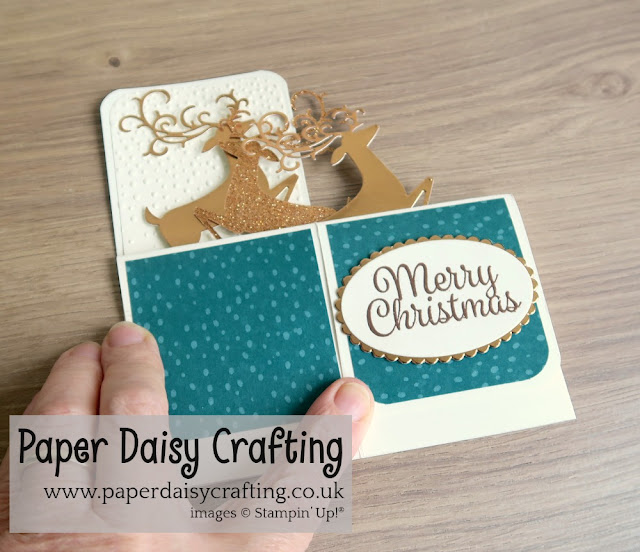
The great thing about these cards is that they fold absolutely flat for popping in an envelope for posting - see pic below!
Would you like to learn how to make one of these cards? I have made two video tutorials for you - one to show how to actually construct the card and the mechanism and one to show you how I decorated my card to come up with the one shown. I'll post the second one tomorrow, but for today, here is the first one showing you how to construct the card. Just click HERE or on the image below:
Here are the measurements you will need for your pop up card in a box:
METRIC
Begin with an A4 sheet of cardstock (21cm x 29.7cm)
Score along the long side and score at 7cm, 14cm, 21cm and 28cm.
Turn 180 degrees and score at 7cm. Then trim off a piece at 15cm (so that the strip is 6 cm wide - keep this piece for later).
Back panels - two panels measuring 6.5cm x 14.5cm - one embossed (if desired)
IMPERIAL
Begin with an A4 sheet of cardstock (8 1/4 in x 11 3/4 ins)
Score along the long side and score at 2 3/4", 5 1/2", 8 1/4" and 11"
Turn 180 degrees and score at 2 3/4". Then trim off a piece at 6ins (so that the strip is 2 1/4" wide - keep this piece for later).
Back panels - two panels measuring 2 1/2" x 5 3/4" - one embossed (if desired)
Please pop back tomorrow to see the second video and the second card I made. Til then, have a great day,

All the products I have used to make this project are all available from my online shop. Simply click "Shop Now" button on the top of this page or click any of the images below to go direct to that item in my online Stampin’ Up! shop. If you order from my online shop please use my monthly shopping code (below) to receive a free thank you gift from me as I really appreciate your business. (If your order is £150 or more then please do not use my code as you will earn Stampin' Rewards in your own right and can choose your own freebies!)

If you would prefer a more personal service, have any questions or need help with your order, please either send me an email or give me a ring. I'll be more than happy to help. You can also find me on Facebook, Instagram, Pinterest and YouTube - links on the left of this page.
Product List At the team training event I attended a few weeks ago, one of the Make and Take projects, designed by my upline Michelle Last, was a pop up card in a box. I've not made one of these before and was keen to try it but decided to change it up a little. Michelle used the "Spirited Snowmen" stamp set for her card and went for a more shabby chic, vintage look. I went (as usual) for a more clean and simple look. This was the card I made:

I used the leaping deer die from the Detailed Deer thinlits, cut three times from copper foil card and copper glimmer paper (from the Joyous Noel pack).

The great thing about these cards is that they fold absolutely flat for popping in an envelope for posting - see pic below!

Would you like to learn how to make one of these cards? I have made two video tutorials for you - one to show how to actually construct the card and the mechanism and one to show you how I decorated my card to come up with the one shown. I'll post the second one tomorrow, but for today, here is the first one showing you how to construct the card. Just click HERE or on the image below:
Here are the measurements you will need for your pop up card in a box:
METRIC
Begin with an A4 sheet of cardstock (21cm x 29.7cm)
Score along the long side and score at 7cm, 14cm, 21cm and 28cm.
Turn 180 degrees and score at 7cm. Then trim off a piece at 15cm (so that the strip is 6 cm wide - keep this piece for later).
Back panels - two panels measuring 6.5cm x 14.5cm - one embossed (if desired)
IMPERIAL
Begin with an A4 sheet of cardstock (8 1/4 in x 11 3/4 ins)
Score along the long side and score at 2 3/4", 5 1/2", 8 1/4" and 11"
Turn 180 degrees and score at 2 3/4". Then trim off a piece at 6ins (so that the strip is 2 1/4" wide - keep this piece for later).
Back panels - two panels measuring 2 1/2" x 5 3/4" - one embossed (if desired)
Please pop back tomorrow to see the second video and the second card I made. Til then, have a great day,
All the products I have used to make this project are all available from my online shop. Simply click "Shop Now" button on the top of this page or click any of the images below to go direct to that item in my online Stampin’ Up! shop. If you order from my online shop please use my monthly shopping code (below) to receive a free thank you gift from me as I really appreciate your business. (If your order is £150 or more then please do not use my code as you will earn Stampin' Rewards in your own right and can choose your own freebies!)

If you would prefer a more personal service, have any questions or need help with your order, please either send me an email or give me a ring. I'll be more than happy to help. You can also find me on Facebook, Instagram, Pinterest and YouTube - links on the left of this page.


 Specialty Designer Series Paper")


No comments:
Post a Comment