
Hi there,
Welcome to my blog today and thanks for dropping by. I'm super excited to bring you today's project - a beautiful handmade advent calendar!
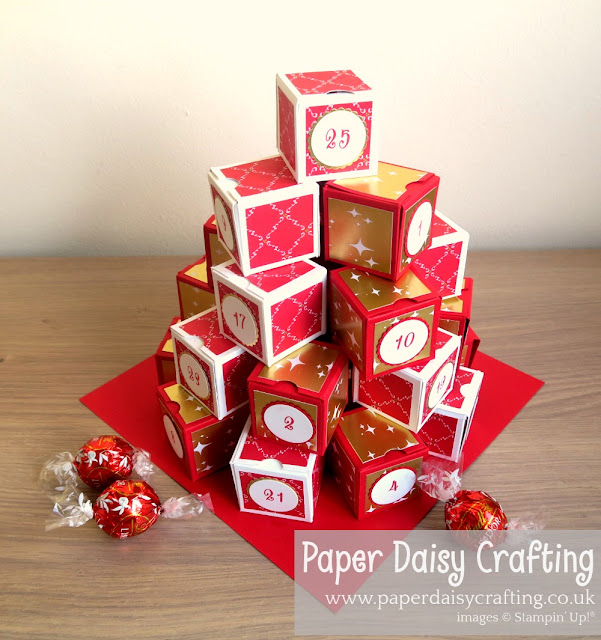
25 little hand decorated boxes each containing a chocolate treat! I have to totally credit the lovely Katrina King over at Katrina's Papercrafting Corner for the original idea. You can read her post all about it HERE. As soon as I saw Katrina's version last November, I knew I wanted to make one but I've waited a whole year!
I have changed the dimensions a little for mine - my boxes are a bit smaller and so a delicious Lindt Lindor chocolate fits them perfectly! It really is quite an easy project but quite time consuming. I did mine in four stages.
Stage one was making the 25 little boxes from card stock. On the advent calendar above I used two colours of card stock - Real Red and Whisper White - just a bit of cutting, scoring, burnishing, trimming and gluing.
Stage two was decorating the boxes with little squares of DSP (patterned papers and punching out the "thumb slot". In the one shown I have used papers from the "Under the Mistletoe" and "Broadway Bound" packs.
Stage three was gluing the boxes together securely.
Stage four was adding the numbers - oh and not forgetting, adding the chocolates!
I have made a video tutorial for you showing how to do Stages One and Two (more to follow!). As you'll see I used a different colour scheme for my second one. To watch the video click HERE or on the image below.
The measurements you'll need for your 25 boxes are as follows:
METRIC
Card stock - 13cm x 17cm
Score at 1cm, 5cm, 9cm and 13cm
Turn and score at 1cm, 5cm and 9cm
Burnish score lines then cut and trim as in template below
IMPERIAL
Card stock - 5ins x 6.5ins
Score at 1/2ins, 2ins, 3 1/2ins and 5 ins
Turn and score at 1/2ins, 2 and 3 1/2 ins
Burnish score lines then cut and trim as in template below
I meant to do a template to show you where to cut and trim but totally forgot so have "borrowed" Katrina's!! PLEASE NOTE - I have used different measurements to Katrina - the template is just to show you where to cut and trim!

I hope you love this project as much as I do and will have a go at making one in time for December 1st.
I'll be back tomorrow to show you how to put the boxes together to construct the stack! Don't miss it!!

All the products I have used to make this project are all available from my online shop. Simply click "Shop Now" button on the top of this page or click any of the images below to go direct to that item in my online Stampin’ Up! shop. If you order from my online shop please use my monthly shopping code (below) to receive a free thank you gift from me as I really appreciate your business. (If your order is £150 or more then please do not use my code as you will earn Stampin' Rewards in your own right and can choose your own freebies!)

If you would prefer a more personal service, have any questions or need help with your order, please either send me an email or give me a ring. I'll be more than happy to help. You can also find me on Facebook, Instagram, Pinterest and YouTube - links on the left of this page.
Product List Welcome to my blog today and thanks for dropping by. I'm super excited to bring you today's project - a beautiful handmade advent calendar!

25 little hand decorated boxes each containing a chocolate treat! I have to totally credit the lovely Katrina King over at Katrina's Papercrafting Corner for the original idea. You can read her post all about it HERE. As soon as I saw Katrina's version last November, I knew I wanted to make one but I've waited a whole year!
I have changed the dimensions a little for mine - my boxes are a bit smaller and so a delicious Lindt Lindor chocolate fits them perfectly! It really is quite an easy project but quite time consuming. I did mine in four stages.
Stage one was making the 25 little boxes from card stock. On the advent calendar above I used two colours of card stock - Real Red and Whisper White - just a bit of cutting, scoring, burnishing, trimming and gluing.
Stage two was decorating the boxes with little squares of DSP (patterned papers and punching out the "thumb slot". In the one shown I have used papers from the "Under the Mistletoe" and "Broadway Bound" packs.
Stage three was gluing the boxes together securely.
Stage four was adding the numbers - oh and not forgetting, adding the chocolates!
I have made a video tutorial for you showing how to do Stages One and Two (more to follow!). As you'll see I used a different colour scheme for my second one. To watch the video click HERE or on the image below.
The measurements you'll need for your 25 boxes are as follows:
METRIC
Card stock - 13cm x 17cm
Score at 1cm, 5cm, 9cm and 13cm
Turn and score at 1cm, 5cm and 9cm
Burnish score lines then cut and trim as in template below
IMPERIAL
Card stock - 5ins x 6.5ins
Score at 1/2ins, 2ins, 3 1/2ins and 5 ins
Turn and score at 1/2ins, 2 and 3 1/2 ins
Burnish score lines then cut and trim as in template below
I meant to do a template to show you where to cut and trim but totally forgot so have "borrowed" Katrina's!! PLEASE NOTE - I have used different measurements to Katrina - the template is just to show you where to cut and trim!

I hope you love this project as much as I do and will have a go at making one in time for December 1st.
I'll be back tomorrow to show you how to put the boxes together to construct the stack! Don't miss it!!
All the products I have used to make this project are all available from my online shop. Simply click "Shop Now" button on the top of this page or click any of the images below to go direct to that item in my online Stampin’ Up! shop. If you order from my online shop please use my monthly shopping code (below) to receive a free thank you gift from me as I really appreciate your business. (If your order is £150 or more then please do not use my code as you will earn Stampin' Rewards in your own right and can choose your own freebies!)

If you would prefer a more personal service, have any questions or need help with your order, please either send me an email or give me a ring. I'll be more than happy to help. You can also find me on Facebook, Instagram, Pinterest and YouTube - links on the left of this page.


 Scallop Circle Punch")


Hi, lovely calender, but your measurements is a bit off...on your video you score different... :)
ReplyDeleteHi, Thanks for your comment. Checked the measurements I've given and the video and they seem OK? Or were you looking at the template - I did say earlier in the post that I changed the dimensions for mine. The template was just to show where to cut/trim. I've added a note to make that clear. When I get the chance I'll update with my own template.
ReplyDelete