Showing posts with label customer thank you. Show all posts

Thursday, 11 March 2021

Stampin' Dreams March Blog Hop - Anything But a Card


Hi everyone,

Welcome to my blog today and to the Stampin' Dreams blog hop for March. I hope you've had fun hopping around some of the links already. Our theme for this month is "Anything But a Card". If you have been following me for a while, you'll know that at least 90% of my projects are cards, so this theme is making me stretch my comfort zone.
But once a month I do make a little gift to include in my customer thank you packages and today I am bringing you the gift I have sent this month. 


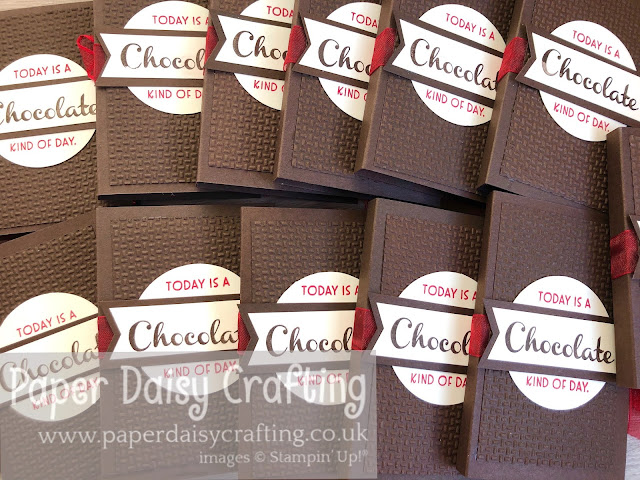
This is a wrap for a Four Finger KitKat bar. I used Early Espresso card stock which is the nearest colour to chocolate that we have in our collection. The message is stamped with the Nothing's Better Than stamp set - I love this set. So, so versatile. Sadly the embossing folder I have used has now retired but any other one would work for this project, especially one with a small design. 


And here are just some of the little treats I made to send to customers this month. I was hoping they might have received them by the time this post goes out but as I only posted them yesterday, they are probably still on their way. So sorry to spoil the surprise for all those customers! 


Earlier in the month I made some larger versions of this little treat package to send to several friends, all of whom were laid low with Covid 19. I hope they cheered them up just a little. These ones housed a bigger bar of chocolate - the very yummy Lindt Lindor. 


This is a really quick and easy way to package up a chocolate gift ready to cheer up someone's day. Do you think you might give it a try? I'll be back one day next week with a video tutorial to show you how to make it, if you do.

Meanwhile, there are still lots of projects for you to take a look at. Please keep clicking on the links to see the amazing creations  everyone has made. 


Bye for now, back soon,


All the products I have used to make this project are available from my online shop. Simply click "Shop Now" button on the top of this page or click any of the images below to go direct to that item in my online Stampin’ Up! shop. If you order from my online shop please use my monthly shopping code (below) to receive a free thank you gift from me as I really appreciate your business. (If your order is £150 or more then please do not use my code as you will earn Stampin' Rewards in your own right and can choose your own freebies!)

If you would prefer a more personal service, have any questions or need help with your order, please either send me an email or give me a ring. I'll be more than happy to help. You can also find me on Facebook, Instagram, Pinterest and YouTube - links on the left of this page.
  

Tuesday, 24 November 2020

Customer Thank You cards with Christmas Gleaming

Hi everyone,

Thanks for joining me today and welcome to my regular Tuesday Card Making for Beginners post. I think we are now up to Week 22. Do go back and have a look at some of the other posts and videos if you haven't seen them already.

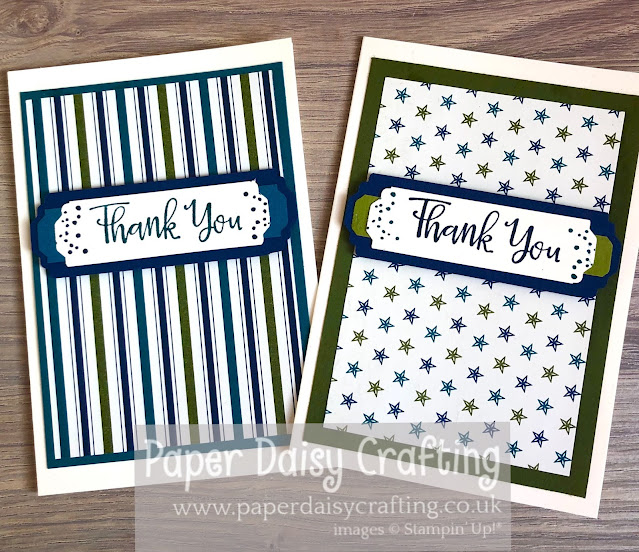
Today I am bringing you the customer thank you cards I made for everyone who ordered with me last month - and there were a lot of you. As always I am so grateful for each and every order.


To make these cards I needed very few supplies. I used our Very Vanilla notecards, the beautiful foiled Brightly Gleaming papers, the Pick a Label punch and the "Thank You" from Peaceful Moments. Oh and some card stock and inks in coordinating colours - Pretty Peacock, Night of Navy and Mossy Meadow.


Very simple little cards but oh so pretty. I was inspired by a card I received recently from one of my team.

If you'd like to see how I made these cards, you can watch my video by CLICKING HERE or on the image below. 


I do hope all my customers liked their cards this month. I has a lovely afternoon in front of a Netflix movie crating them!

Back tomorrow,


All the products I have used to make this project are available from my online shop. Simply click "Shop Now" button on the top of this page or click any of the images below to go direct to that item in my online Stampin’ Up! shop. If you order from my online shop please use my monthly shopping code (below) to receive a free thank you gift from me as I really appreciate your business. (If your order is £150 or more then please do not use my code as you will earn Stampin' Rewards in your own right and can choose your own freebies!)


If you would prefer a more personal service, have any questions or need help with your order, please either send me an email or give me a ring. I'll be more than happy to help. You can also find me on Facebook, Instagram, Pinterest and YouTube - links on the left of this page.


  Product List

Sunday, 1 November 2020

Customer thank you cards

Hi everyone,

How are you doing? Well, I hope and staying safe with these rising virus levels. 

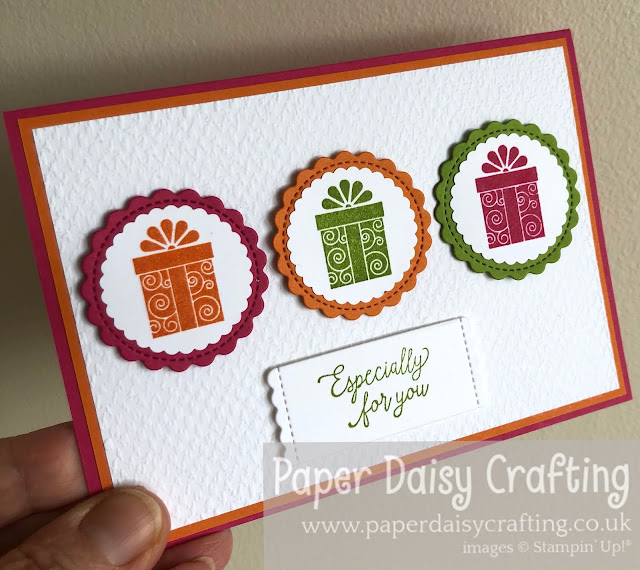
Today I wanted to show you the cards I made to say thank you to my customers last month. As you might know, each month I send out thank you packages to everyone who has ordered from me the previous month just to show how grateful I am for their orders. Everyone receives a handmade card and a handmade/packaged gift. These were the latest cards. 


You might recognise the design of this card - I made it in two alternative colour schemes earlier in the month. 


I had to make lots of copies of this card as I had loads of orders in September making it one of my best months so far with Stampin' Up!


I don't always manage to do this, but this month I managed to make the handmade/hand packaged gift coordinate with the card!


Anyone who has also used my Monthly Shopping Code receives a FREE product gift. These gifts vary from month to month - last month it was a pack of the lovely glittery Wonderful Gems - great for adding a little bit of bling to Christmas projects. The red ones make great holly berries!


If you'd like to see the video tutorial of how I made the original card you can see it HERE or by clicking on the image below. All I did was change the colours to Granny Apple Green, Melon Mambo and Pumpkin Pie. 


I've given you a sneak peek of the handmade gift above but will back with more details of that soon - don't miss it! 

See you soon,


All the products I have used to make this project are available from my online shop. Simply click "Shop Now" button on the top of this page or click any of the images below to go direct to that item in my online Stampin’ Up! shop. If you order from my online shop please use my monthly shopping code (below) to receive a free thank you gift from me as I really appreciate your business. (If your order is £150 or more then please do not use my code as you will earn Stampin' Rewards in your own right and can choose your own freebies!)


If you would prefer a more personal service, have any questions or need help with your order, please either send me an email or give me a ring. I'll be more than happy to help. You can also find me on Facebook, Instagram, Pinterest and YouTube - links on the left of this page.

Product List

Friday, 20 March 2020

Handmade notebook with Best Dressed papers

Hi everyone,

As most of you probably know, every month I love to send out little packages of goodies to all customers who shopped with me the previous month. My customers are so important to me and I want them all to know how much I appreciate them choosing me as their demonstrator. I always send a handmade card and a little gift that has been beautifully handmade or packaged. And this is what I made for last month's customers.

Best dressed notebook Stampin Up

It is a little handbag-sized notebook and I have used the ever so pretty Best Dressed papers. I had to make a whole little pile of these but had a bit of a senior moment and forgot to take a photo of them before I sent them off. So this one is the only one I had left to photograph.

Best dressed notebook Stampin Up

I've made a little video to show you how I made them. I started off with a pile of notebooks which I bought in Wilko's (you'll know it if you are in the UK) and covered them with card stock and DSP. If you want to watch the video just CLICK HERE or on the image below.  
                              

There's not really any point in me giving you the measurements for my notebook as yours might be a different size. You just need your cardstock to be slightly wider than your notebook and to allow enough for it to wrap around the top to cover the spine. Hope that makes sense!!


All the products I have used to make this project are available from my online shop. Simply click "Shop Now" button on the top of this page or click any of the images below to go direct to that item in my online Stampin’ Up! shop. If you order from my online shop please use my monthly shopping code (below) to receive a free thank you gift from me as I really appreciate your business. (If your order is £150 or more then please do not use my code as you will earn Stampin' Rewards in your own right and can choose your own freebies!)


If you would prefer a more personal service, have any questions or need help with your order, please either send me an email or give me a ring. I'll be more than happy to help. You can also find me on Facebook, Instagram, Pinterest and YouTube - links on the left of this page.

Product List